・14 min read
raspberry pi picoのタイマー機能を使ってmagic wandのサンプルを動かした
はじめに
前回 、独自データで再学習した推論器でmagic wandの推論をした。ただ認識精度が良くなかったので、そこの改善のためにタイマー機能を使ってみた。
環境
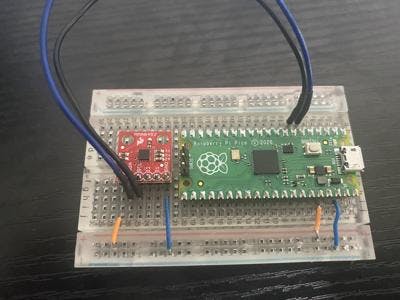
- PC
- windows 10
- pico
- USBケーブル
- 家に転がってたものを
- 加速度センサー(MMA8452Q)
- https://www.switch-science.com/catalog/1927/
- ピンヘッダはあまりものを使ってはんだ付けした
- 330Ωの抵抗 x 2
- 動作確認では手元になかったので使ってないが、ドキュメントを見た感じ合った方がよさそう。
- ブレッドボードやジャンパー
- VDD/GND用 2 or 4本
- SCL/SDA用 2本
- 開発環境
- Visual Studio Code
- Google Colabratory
- 動作確認環境
- TeraTerm

精度改善の方針
推論時の挙動を眺めていると、推論できるデータを格納して推論していない時と推論しているときでloopの処理時間が大幅に変わっている。
推論の計算負荷があり、推論していると25Hzで動作していなかった。
推論の計算負荷があり、推論していると25Hzで動作していなかった。
学習時にデータの水増しをしているので、多少はその辺の影響は薄れるかもしれない。
とはいえ、学習用データに近い状態の方がいいに決まっているので、25Hzでデータを格納するよう改善してみる。
そのためにタイマー機能を使って40msごとにデータを格納する。
とはいえ、学習用データに近い状態の方がいいに決まっているので、25Hzでデータを格納するよう改善してみる。
そのためにタイマー機能を使って40msごとにデータを格納する。
raspberry pi picoでのタイマー機能
pico sdk のexamplesにhello_timeがある。
手順は大きく3つ。
- pico/stdlibを読み込む
- コールバックのメソッドを用意する
- add_repeating_timer_ms()でタイマーを設定する
1. pico/stdlibを読み込む
- CMakeLists.txtでlibraryをリンクする
- target_link_libraries(hello_timer pico_stdlib)
- 利用するcファイルでincludeする
- #include "pico/stdlib.h"
2. コールバックのメソッドを用意する
exmapleでは下記が該当する。
bool repeating_timer_callback(struct repeating_timer *t) {
    printf("Repeat at %lld\n", time_us_64());
    return true;
}ドキュメントではrepeating_timer_callback_tとあり、repeating_timer_t を引数にとり、boolを返すメソッドであればいい。
3. add_repeating_timer_ms()でタイマーを設定する
exmaplesでは下記が該当する。
// Create a repeating timer that calls repeating_timer_callback.
    // If the delay is > 0 then this is the delay between the previous callback ending and the next starting.
    // If the delay is negative (see below) then the next call to the callback will be exactly 500ms after the
    // start of the call to the last callback
    struct repeating_timer timer;
    add_repeating_timer_ms(500, repeating_timer_callback, NULL, &timer);
    sleep_ms(3000);
    bool cancelled = cancel_repeating_timer(&timer);
    printf("cancelled... %d\n", cancelled);
    sleep_ms(2000);

    // Negative delay so means we will call repeating_timer_callback, and call it again
    // 500ms later regardless of how long the callback took to execute
    add_repeating_timer_ms(-500, repeating_timer_callback, NULL, &timer);
    sleep_ms(3000);
    cancelled = cancel_repeating_timer(&timer);
    printf("cancelled... %d\n", cancelled);
sleep_ms(2000);引数について確認してみよう。
delay_ms
delay_msが正の値なのか負の値なのかで挙動が変わる。
ただ、ドキュメントの文章だとなんのことかわかりにくい、
ただ、ドキュメントの文章だとなんのことかわかりにくい、
the repeat delay in milliseconds; if >0 then this is the delay between one callback ending and the next starting; if <0 then this is the negative of the time between the starts of the callbacks. The value of 0 is treated as 1 microsecond DeepL翻訳をしてもよくわからない。
もし>0なら、あるコールバックが終了してから次のコールバックが開始するまでの遅延時間、もし<0なら、コールバックが開始するまでの時間のマイナス値。0の値は1マイクロ秒として扱われる。
exampleの方にもコメントがあり
// Create a repeating timer that calls repeating_timer_callback.
    // If the delay is > 0 then this is the delay between the previous callback ending and the next starting.
    // If the delay is negative (see below) then the next call to the callback will be exactly 500ms after the
    // start of the call to the last callback

    // Negative delay so means we will call repeating_timer_callback, and call it again
    // 500ms later regardless of how long the callback took to execute
DeepL翻訳をすると
delayが> 0の場合、前のコールバックが終了してから次のコールバックが開始するまでの遅延時間です。
遅延が負の値である場合(下記参照)、コールバックの次の呼び出しは、最後のコールバックの呼び出しからちょうど500ms後になります。

負の遅延は、コールバックの実行時間に関係なく、repeating_timer_callbackを呼び出し、500ms後に再び呼び出すことを意味します。
つまりdelay_msが正の時はこの図のように、コールバック処理が終わってからdelay_ms待つ。

なお、この図では、delay_ms = 2ms とし、コールバックの処理に1msかかるとする。
反対に負の値の時は、コールバックが呼ばれる間隔がdelay_msとなる。

実際に動かしてみると、delay_msに正の値をいれると500msごとにならず、負の値だとほぼ500msだった。
これは正の値だと、コールバックの処理分遅れが遅れるからだろう。
これは正の値だと、コールバックの処理分遅れが遅れるからだろう。

calback
手順2の通り。
user_data
user data to pass to store in the repeating_timer structure for use by the callback. とあり、タイマーでコールバックが呼ばれたときに渡したいデータを格納できると考えられる。
out
the pointer to the user owned structure to store the repeating timer info in. BEWARE this storage location must outlive the repeating timer, so be careful of using stack space
タイマー情報を格納した構造体のポインターで、タイマー処理より長生きしないといけない。
タイマー情報を持ってるので、キャンセルするときとかに使う。
タイマー情報を持ってるので、キャンセルするときとかに使う。
magic wandに組み込む
main_function.cppを書き換えた。
ひとまず動けばいいだけのコードなので構造は汚いが、タイマーで40msごとにデータが格納される。
ひとまず動けばいいだけのコードなので構造は汚いが、タイマーで40msごとにデータが格納される。
/* Copyright 2019 The TensorFlow Authors. All Rights Reserved.
Licensed under the Apache License, Version 2.0 (the "License");
you may not use this file except in compliance with the License.
You may obtain a copy of the License at
http://www.apache.org/licenses/LICENSE-2.0
Unless required by applicable law or agreed to in writing, software
distributed under the License is distributed on an "AS IS" BASIS,
WITHOUT WARRANTIES OR CONDITIONS OF ANY KIND, either express or implied.
See the License for the specific language governing permissions and
limitations under the License.
==============================================================================*/
#include "main_functions.h"
#include "accelerometer_handler.h"
#include "constants.h"
#include "gesture_predictor.h"
#include "magic_wand_model_data.h"
#include "output_handler.h"
#include "tensorflow/lite/micro/micro_error_reporter.h"
#include "tensorflow/lite/micro/micro_interpreter.h"
#include "tensorflow/lite/micro/micro_mutable_op_resolver.h"
#include "tensorflow/lite/schema/schema_generated.h"
#include "tensorflow/lite/version.h"
#include "tensorflow/lite/micro/all_ops_resolver.h"
#include "pico/stdlib.h"
// Globals, used for compatibility with Arduino-style sketches.
namespace {
tflite::ErrorReporter* error_reporter = nullptr;
const tflite::Model* model = nullptr;
tflite::MicroInterpreter* interpreter = nullptr;
TfLiteTensor* model_input = nullptr;
int input_length;
// Create an area of memory to use for input, output, and intermediate arrays.
// The size of this will depend on the model you're using, and may need to be
// determined by experimentation.
constexpr int kTensorArenaSize = 1024*60;
uint8_t tensor_arena[kTensorArenaSize];
bool should_clear_buffer = false;
struct repeating_timer timer;
bool got_data = false;
} // namespace
bool repeating_timer_callback(struct repeating_timer *t) {
// Attempt to read new data from the accelerometer.
printf("Repeat at %lld\n", time_us_64());
got_data = ReadAccelerometer(error_reporter, model_input->data.f, input_length, should_clear_buffer);
return true;
}
// The name of this function is important for Arduino compatibility.
void setup() {
stdio_init_all();
// Set up logging. Google style is to avoid globals or statics because of
// lifetime uncertainty, but since this has a trivial destructor it's okay.
static tflite::MicroErrorReporter micro_error_reporter; // NOLINT
error_reporter = µ_error_reporter;
// Map the model into a usable data structure. This doesn't involve any
// copying or parsing, it's a very lightweight operation.
model = tflite::GetModel(g_magic_wand_model_data);
if (model->version() != TFLITE_SCHEMA_VERSION) {
TF_LITE_REPORT_ERROR(error_reporter,
"Model provided is schema version %d not equal "
"to supported version %d.",
model->version(), TFLITE_SCHEMA_VERSION);
return;
}
// Pull in only the operation implementations we need.
// This relies on a complete list of all the ops needed by this graph.
// An easier approach is to just use the AllOpsResolver, but this will
// incur some penalty in code space for op implementations that are not
// needed by this graph.
static tflite::MicroMutableOpResolver<5> micro_op_resolver; // NOLINT
micro_op_resolver.AddConv2D();
micro_op_resolver.AddDepthwiseConv2D();
micro_op_resolver.AddFullyConnected();
micro_op_resolver.AddMaxPool2D();
micro_op_resolver.AddSoftmax();
// static tflite::AllOpsResolver micro_op_resolver;
// Build an interpreter to run the model with.
static tflite::MicroInterpreter static_interpreter(
model, micro_op_resolver, tensor_arena, kTensorArenaSize, error_reporter);
interpreter = &static_interpreter;
// Allocate memory from the tensor_arena for the model's tensors.
interpreter->AllocateTensors();
// Obtain pointer to the model's input tensor.
model_input = interpreter->input(0);
if ((model_input->dims->size != 4) || (model_input->dims->data[0] != 1) ||
(model_input->dims->data[1] != 64+18) ||
(model_input->dims->data[2] != kChannelNumber) ||
(model_input->type != kTfLiteFloat32)) {
TF_LITE_REPORT_ERROR(error_reporter,
"Bad input tensor parameters in model");
return;
}
input_length = model_input->bytes / sizeof(float);
TfLiteStatus setup_status = SetupAccelerometer(error_reporter);
if (setup_status != kTfLiteOk) {
TF_LITE_REPORT_ERROR(error_reporter, "Set up failed\n");
}
add_repeating_timer_ms(-40, repeating_timer_callback, NULL, &timer);
}
void loop() {
// Don't try to clear the buffer again
should_clear_buffer = false;
// If there was no new data, wait until next time.
if (!got_data){
sleep_ms(40);
return;
}
// Run inference, and report any error.
TfLiteStatus invoke_status = interpreter->Invoke();
if (invoke_status != kTfLiteOk) {
TF_LITE_REPORT_ERROR(error_reporter, "Invoke failed on index: %d\n",
begin_index);
return;
}
// Analyze the results to obtain a prediction
int gesture_index = PredictGesture(interpreter->output(0)->data.f);
should_clear_buffer = gesture_index < 3;
// Produce an output
HandleOutput(error_reporter, gesture_index);
if(should_clear_buffer){
cancel_repeating_timer(&timer);
got_data = ReadAccelerometer(error_reporter, model_input->data.f, input_length, should_clear_buffer);
sleep_ms(40);
add_repeating_timer_ms(-40, repeating_timer_callback, NULL, &timer);
}
}実行
前回よりだいぶ認識精度があがったと思う。
終わりに
今回は、magic wandの認識精度改善のために、タイマーを用いることで学習用データと同じ周波数でデータを格納できるようにした。
ひとまずpicoでtensorflowを扱うのはここまでにして、次回からはpicoの機能自体に目を向けていこうかなと思う。
